Showing posts with label Side Dishes. Show all posts

Piquillo Pepper Chicken with Spanish Rice


***I don't know what I did to deserve such awesome readers, but I tell you what - You guys ROCK!  I keep getting such sweet e-mail messages from you all...I can't explain to you how much I appreciate these messages.  They always make me smile!  You guys are the reason that I keep writing this blog.  You continuously inspire me to keep cooking and sharing it with the world! 

On that note, I couldn't wait to share this recipe.  We had this for dinner tonight, and it was delicious!  You know what they say - "You eat with your eyes first."  This meal is the perfect example of this.  The vibrant colors of this dish just make you WANT to eat it!  The gorgeous yellow of the rice...the ruby red pepper sauce on the chicken...the green speckles of fresh parsley spattered about throughout the dish...WOW!  This chicken dish is both beautiful on the plate and in your mouth!

The rice just might even be better than the chicken...The rice has the perfect little touch of sweetness from the golden raisins, paired with the savory goodness of toasted almonds.  This rice kicks butt!  I will definitely be making this rice again and again.  It will pair easily with so many other main courses.

This recipe is yet another from Rachael Ray's Look + Cook cookbook.  If you can't tell already, I am really enjoying this new cookbook.  In fact, I gave an autographed copy to one of my little sisters for Christmas, and she's hooked too.

Try this soon...You'll love it!

Bon Appetit!***

Piquillo Pepper Chicken with Spanish Rice
Source Look + Cook by Rachael Ray

Ingredients:

  • 3 cups chicken broth
  • 1 small handful golden raisins
  • 3 tablespoons extra-virgin olive oil (EVOO)
  • ½ teaspoon turmeric
  • 1 pinch saffron threads or 1 envelope saffron powder
  • 1½ cups white rice
  • 4 skinless, boneless chicken breast halves (about 1-3/4 pounds)
  • Salt and freshly ground pepper
  • 4 jarred piquillo peppers or 2 jarred roasted red peppers, drained and sliced
  • ½ cup dry sherry
  • 2 tablespoons butter, chilled and cut into pieces
  • ½ cup chopped flat-leaf parsley (a generous handful)
  • ½ cup sliced almonds, lightly toasted (a generous handful)

Directions:

  1. In a small saucepan, bring the broth, raisins, 1 tablespoon EVOO, turmeric and saffron to a boil. Stir in the rice, cover the pot and simmer over low heat for 18 minutes.
  2. While the rice cooks, in a large skillet, heat the remaining 2 tablespoons EVOO, 2 turns of the pan, over medium-high heat. Season the chicken liberally with salt and pepper; add to the skillet and cook for 6 minutes on each side. Transfer to a plate and keep warm. Add the piquillo peppers to the pan and heat through, about 2 minutes. Add the sherry and boil until slightly reduced, 1 to 2 minutes. Add the butter and half the parsley and turn off the heat, stirring to melt the butter. Spoon the sauce over the chicken.
  3. Add the remaining parsley and the almonds to the rice and fluff with a fork. Serve the rice alongside the chicken.

  • Digg
  • Del.icio.us
  • StumbleUpon
  • Reddit
  • RSS

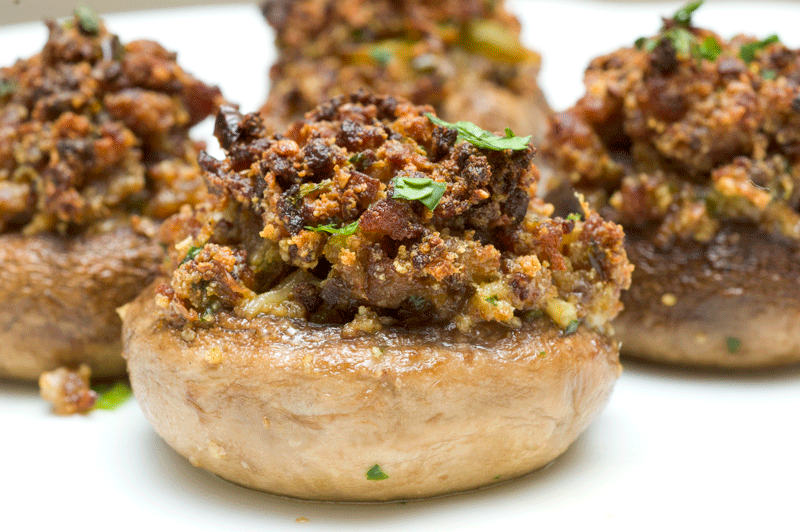
Sausage-Stuffed Mushrooms


***Marsala wine and mushrooms are quite the perfect pair!  Ina Garten takes advantage of that perfect marriage of flavors in her recipe for Sausage-Stuffed Mushrooms.  On my way home from work tonight, I stopped by The Fresh Market (Which, by the way has to be my favorite grocery store!!).  There, I picked up the extra-large mushrooms, sweet Italian sausage and Italian mascarpone cheese that I needed.  


Once at home, I got to work on these yummy little mushrooms!  After they are stuffed, they need about 40 - 50 minutes in the oven, so be sure to give yourself enough time.  Ina calls for 50 minutes, but I found that mine were ready after 40 minutes....Just keep an eye on them!


The flavor of the stuffing is incredible.  The mascarpone and parmesan cheeses add a luxurious texture.  The only change that I made was with the scallions.  I simply substituted the scallions with some minced green bell pepper.  It worked beautifully!

I could definitely see these served as part of a Thanksgiving dinner...They taste special enough for a party, but are easy enough to serve as part of a stress-free family dinner.  The extra large mushrooms are filling and meaty themselves, so when the stuffing is added they almost become a meal in themselves!


Bon Appetit!***

BEFORE going into the oven!

Sausage-Stuffed Mushrooms
Source:  How Easy Is That? by Ina Garten

Ingredients

  • 16 extra-large white mushrooms
  • 5 tablespoons good olive oil, divided
  • 2 1/2 tablespoons Marsala wine or medium sherry
  • 3/4 pound sweet Italian sausage, removed from the casings
  • 6 scallions, white and green parts, mince (I substituted with minced green bell pepper)
  • 2 garlic cloves minced
  • 2/3 cup panko crumbs
  • 5 ounces mascarpone cheese, preferably from Italy
  • 1/3 cup freshly grated Parmesan
  • 2 1/2 tablespoons minced fresh parsley leaves
  • Salt and freshly ground black pepper

Directions

Preheat the oven to 325 degrees F. 

Remove the stems from the mushrooms and chop them finely. Set aside. Place the mushroom caps in a shallow bowl and toss with 3 tablespoons of the olive oil and Marsala. Set aside.

Heat the remaining 2 tablespoons olive oil in a medium skillet over medium heat. Add the sausage, crumbling it with the back of a wooden spoon. Cook the sausage for 8 to 10 minutes, stirring frequently, until it's completely browned. Add the chopped mushroom stems and cook for 3 more minutes. Stir in the scallions and garlic and cook for another 2 to 3 minutes, stirring occasionally. Add the panko crumbs, stirring to combine evenly with all the other ingredients. Finally, swirl in the mascarpone and continue cooking until the mascarpone has melted and made the sausage mixture creamy. Off the heat, stir in the Parmesan, parsley, and season with salt and pepper, to taste, Cool slightly. 

Fill each mushroom generously with the sausage mixture. Arrange the mushrooms in a baking dish large enough to hold all the mushrooms in a snug single layer. Bake until the stuffing for 50 minutes, until the stuffing is browned and crusty.

  • Digg
  • Del.icio.us
  • StumbleUpon
  • Reddit
  • RSS

Sweet Potato Biscuits with Maple and Pecans


***When I saw this recipe in the November 2010 issue of Bon Appetit magazine, I tore it out immediately.  It sounded like the perfect addition to our Thanksgiving table.  The recipe calls for 100% maple syrup and chopped pecans to be added directly to the biscuit dough.  Can biscuits possibly get much more scrumptious than that??  I think NOT!

These biscuits have a sweet and nutty taste, and because of their small size I bet you won't be able to eat just one of them.  I did substitute regular AP flour, instead of using the gluten-free flour that the recipe mentions.  I had already been to the grocery store and wasn't really excited about going yet again before Thanksgiving.  I couldn't really tell a difference...the biscuits still tasted great.  However, I later found a note on the Bon Appetit website that recommends reducing the baking powder to 2 teaspoons if you use AP flour.  Maybe when I make these again tomorrow, I will try this suggestion and see if it makes them any better.

Happy Thanksgiving and Bon Appetit!!!***

Ingredients:
  • 1 large red-skinned sweet potato (yam; about 1 1/4 pounds), pierced with fork
  • 1 1/3 cups gluten-free flour plus additional
  • 2/3 cup yellow cornmeal
  • 1 tablespoon baking powder
  • 3/4 teaspoon salt
  • 1/2 cup (1 stick) chilled unsalted butter, cut into 1/2-inch cubes
  • 1/2 cup buttermilk
  • 1/4 cup Grade B maple syrup
  • 1/2 cup pecans, toasted, chopped
  • Ingredient Info

    For the gluten-free sweet potato biscuits, we used King Arthur Gluten-Free Multi-Purpose Flour. The mix of white rice flour, brown rice flour, tapioca starch, and potato starch gave us tender, delicious results ($8 for a 24-ounce box at kingarthurflour.com).

Preparation

  • Preheat oven to 425°F. Line baking sheet with parchment. Microwave potato until tender, about 6 minutes per side. Halve; scoop out 1 cup flesh. Cool. Blend 1 1/3 cups flour and next 3 ingredients in processor. Add butter; pulse to coarse meal. Add potato, buttermilk, and syrup; process to blend. Add nuts; pulse to blend.
  • Sprinkle dough with flour. Pat into 81/2-inch square. Cut into 16 biscuits. Transfer to baking sheet. Bake until tester inserted into center comes out clean, 18 to 22 minutes.

  • Digg
  • Del.icio.us
  • StumbleUpon
  • Reddit
  • RSS

Classic Cornbread Dressing - Southern Living


***This classic recipe for Cornbread Dressing hits all the right marks.  It's pretty perfect in every way.  This dish is described as "deliciously moist and perfectly seasoned" on the myrecipes.com website, which are the perfect words.

Of course, Cornbread Dressing from scratch takes a little more time and effort to make, but in my experience it is well worth it...especially at Thanksgiving!  Brad looks forward to this dressing all year long!

The biggest change that I made to the recipe below is the addition of mild sausage.  I simply cooked a package of mild country sausage and added it to the vegetable mixture, before mixing everything together.  My other changes are listed in blue below...I took elements from my Mom's Cornbread Dressing recipe and combined them with this recipe from Southern Living.

Bon Appetit!*** 

Cornbread Dressing
Source:  Southern Living magazine; November 2002

Yield: Makes 16 to 18 servings

Ingredients

  • 1  cup  butter or margarine, divided
  • 3  cups  white cornmeal
  • 1  cup  all-purpose flour
  • 2  tablespoons  sugar
  • 2  teaspoons  baking powder
  • 1 1/2  teaspoons  salt
  • 1  teaspoon  baking soda
  • 7  large eggs, divided
  • 3  cups  buttermilk
  • 4 slices sourdough bread, torn into pieces
  • 1/4 lb. saltine crackers, crushed into small pieces
  • 2  medium onions, diced (2 cups)
  • 1  large bunch celery, diced (3 cups)
  • 1/2  cup  finely chopped fresh sage*
  • 48 oz reduced sodium chicken broth
  • 1  tablespoon  pepper
  • 1 lb mild country sausage (optional)

Preparation

Place 1/2 cup butter in a 13- x 9-inch pan; heat in oven at 425° for 4 minutes.

Combine cornmeal and next 5 ingredients; whisk in 3 eggs and buttermilk.

Pour hot butter into batter, stirring until blended. Pour batter into pan.

Bake at 425° for 30 minutes or until golden brown. Cool.

Crumble cornbread into a large bowl; set aside.

Melt remaining 1/2 cup butter in a large skillet over medium heat; add onions and celery, and saute until tender. Stir in sage, and saute 1 more minute.

Stir vegetables, sausage, remaining 4 eggs, chicken broth, sourdough bread pieces, cracker pieces, and pepper into cornbread mixture (There are no better tools than your hands to properly mix the dressing at this stage!); pour evenly into 1 lightly greased 13- x 9-inch baking dish and 1 lightly greased 8-inch square baking dish. Cover and chill 8 hours.

Bake, uncovered, at 375° for 35 to 40 minutes or until golden brown.

*1 tablespoon dried rubbed sage may be substituted for fresh sage.

Andouille Sausage, Apple, and Pecan Dressing: Brown 3/4 pound diced andouille sausage in a skillet over medium heat; drain. Add sausage; 2 Granny Smith apples, chopped; and 2 cups chopped toasted pecans to dressing. Proceed as directed, baking 40 to 45 minutes or until done.

  • Digg
  • Del.icio.us
  • StumbleUpon
  • Reddit
  • RSS

Everyday Granola - Bon Appetit Magazine


***Here's a simple, quick and delicious recipe for "Everyday Granola."  I found this while flipping through a recent issue of Bon Appetit magazine...one of my favorites!  The ingredients sounded perfect for what I had in mind.  It was sweet and salty at the same time, and makes an awesome snack.  You can serve it with yogurt or milk, but I preferred mine plain.

While it's baking, be sure to stir it around on the baking sheet every 10 minutes, as the recipe calls for.  This will keep the pieces around the edges from burning and ensure evenly cooked granola.

The combination of the salty and sweet in this granola is a crowd AND palate pleaser!

Bon Appetit!***


Everyday Granola

Ingredients:
  • 3 cups old-fashioned oats
  • 1 cup coarsely chopped pecans
  • 1/2 cup unsweetened shredded coconut
  • 3 tablespoons (packed) brown sugar
  • 3/4 teaspoon ground cinnamon
  • 1/2 teaspoon ground ginger
  • 1/4 teaspoon (generous) salt
  • 1/3 cup honey
  • 2 tablespoons vegetable oil
  • 1 cup assorted dried fruit

Preparation

  • Preheat oven to 300°F. Line rimmed baking sheet with parchment. Mix first 7 ingredients in large bowl. Stir honey and oil in saucepan over medium-low heat until smooth. Pour honey mixture over oat mixture; toss. Spread on prepared sheet. Bake until golden, stirring every 10 minutes, about 40 minutes. Place sheet on rack. Stir granola; cool. Mix in fruit. DO AHEAD Can be made 1 week ahead. Store airtight.

  • Digg
  • Del.icio.us
  • StumbleUpon
  • Reddit
  • RSS

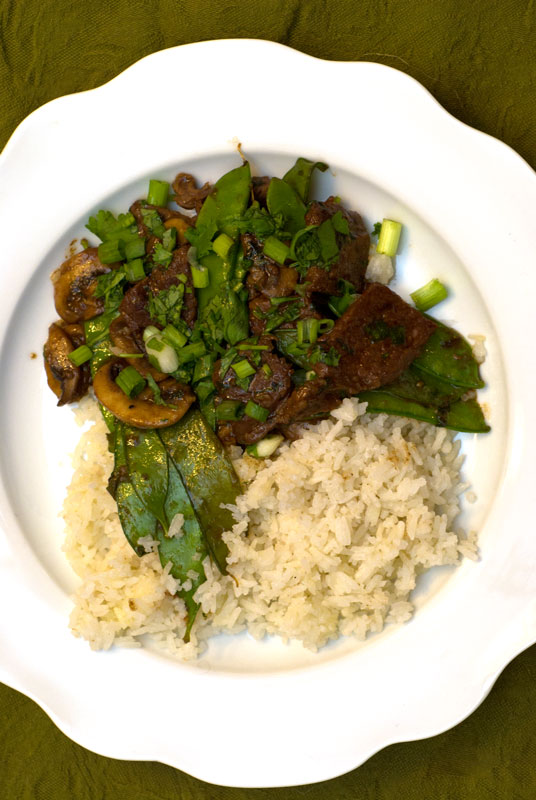
Beef, Shiitake & Snow Pea Stir-Fry with Coconut Rice


***This recipe from the Bon Appetit magazine test kitchens is packed with delicious flavors.  And the best part?  It's actually a quick and easy meal that's perfect for busy weeknights.  That might come as a surprise, but trust me...It comes together in a flash!

I was so happy when I came across this recipe...I was in search of a yummy dinner that was decidedly different.  It seemed like the perfect thing to liven up my usual dinner go-to meals.  Sirloin steak, fresh ginger, snow peas, green onions and cilantro are the stars of this dish.  They work together to create a scrumptious meal that is satisfying and fresh-tasting at the same time.

I paired the stir-fry with one of my favorites - Coconut Rice.  I've included a simple recipe for it by Sandra Lee below.  It was the perfect companion to the stir-fry.  I think you'll really enjoy this recipe!

Bon appetit!***

Beef, Shiitake, and Snow Pea Stir-Fry
4 servings
PREP: 30 minutes TOTAL: 30 minutes
Source:  Bon Appetit magazine; October 2010 Ingredients:
1 1-pound top sirloin steak, cut into 2-inch-long, 1/4-inch-thick slices
1 tablespoon Asian sesame oil
1 tablespoon minced peeled fresh ginger
12 ounces fresh shiitake mushrooms, stemmed, thickly sliced
8 ounces snow peas
1 bunch green onions, sliced, divided
1 cup fresh cilantro leaves, divided
5 tablespoons hoisin sauce
2 teaspoons chili-garlic sauce
1/4 teaspoon Chinese five-spice powder


Preparation:
Sprinkle beef with salt and pepper. Heat oil in large nonstick skillet over medium-high heat. Add ginger and mushrooms; stir-fry until mushrooms are tender, about 3 minutes. Add beef to skillet; stir-fry until beef browns but is still pink in center, about 1 minute. Add snow peas, half of green onions, and half of cilantro; stir-fry 1 minute. Stir in hoisin, chili-garlic sauce, and five-spice powder; sauté until peas are crisp-tender, 1 to 2 minutes. Season with salt and pepper. Transfer to bowl. Sprinkle with remaining green onions and cilantro.

Coconut Rice
Source:  Sandra Lee

Ingredients:

2 cups jasmine rice
1 1/2 cups water
1 cup canned unsweetened coconut milk
1 teaspoon kosher salt


Directions:
Rinse and drain rice in cold water. Place in a saucepan with water, coconut milk, and salt. Place the pot over high heat and, bring the liquid to a boil. Stir and reduce the heat to the lowest possible setting and cover the pot tightly with the lid. Continue cooking for 15 minutes.


Remove the pot from the heat and let stand 10 minutes, covered. Fluff with fork and serve.

  • Digg
  • Del.icio.us
  • StumbleUpon
  • Reddit
  • RSS

Jalapeno Cheddar Cornbread...Not Your Mama's Recipe!


***Here in the south, cornbread is a staple...and this recipe from Ina Garten spices things up a bit...literally! 

If you're tired of the same ole', boring cornbread recipe, then you should give this one a try.  With the addition of cheddar cheese and sliced jalapenos, this isn't your mama's cornbread!  Ina gets it perfect here...Your tastebuds will be greeted by cheesy-goodness right from the first bite.  And just when you think it's safe, your tongue is slapped around a bit by a chunk of jalapeno!

Brad was a huge fan of this cornbread...it is the perfect mix of spicyness and comfort food.  Make this recipe tonight...You'll definitely spice things up!

Bon Appetit!***


Jalapeno Cheddar Cornbread
Source:  Barefoot Contessa at Home, by Ina Garten

Ingredients:
3 cups all-purpose flour
1 cup yellow cornmeal
1/4 cup sugar
2 tablespoons baking powder
2 teaspoons kosher salt
2 cups milk
3 extra-large eggs, lightly beaten
1/2 pound (2 sticks) unsalted butter, melted, plus extra to grease the pan
8 ounces aged extra-sharp Cheddar, grated, divided
1/3 cup chopped scallions, white and green parts, plus extra for garnish, 3 scallions
3 tablespoons seeded and minced fresh jalapeno peppers


Directions:
Combine the flour, cornmeal, sugar, baking powder, and salt in a large bowl. In a separate bowl, combine the milk, eggs, and butter. With a wooden spoon, stir the wet ingredients into the dry until most of the lumps are dissolved. Don't overmix! Mix in 2 cups of the grated Cheddar, the scallions and jalapenos, and allow the mixture to sit at room temperature for 20 minutes.


Meanwhile, preheat the oven to 350 degrees F. Grease a 9 by 13 by 2-inch baking pan.


Pour the batter into the prepared pan, smooth the top, and sprinkle with the remaining grated Cheddar and extra chopped scallions. Bake for 30 to 35 minutes, or until a toothpick comes out clean. Cool and cut into large squares. Serve warm or at room temperature.

  • Digg
  • Del.icio.us
  • StumbleUpon
  • Reddit
  • RSS

Country Hashed Browns - Ina Garten


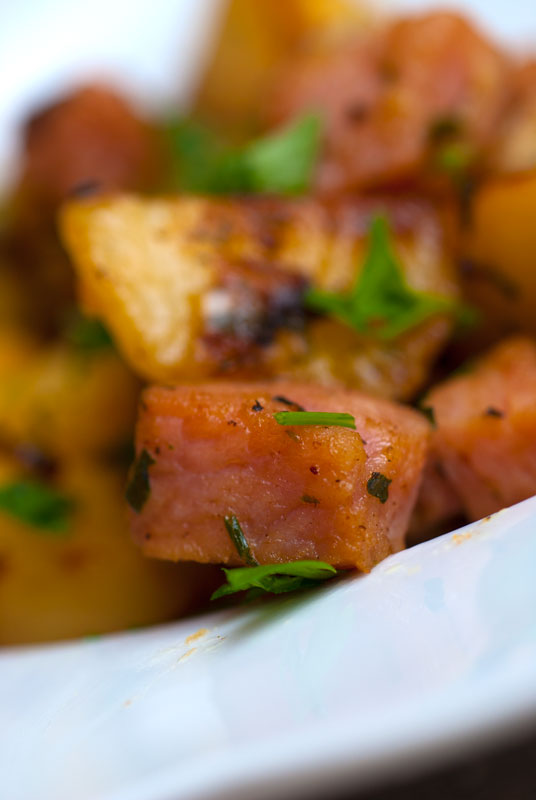
***Ina Garten never lets me down...Her recipes never disappoint and consistently deliver in the flavor department.  Case in point - Her "Country Hashed Browns."  One thing that I adore about the weekend is making a yummy homemade breakfast.  After watching Ina prepare this dish recently on her TV show, I knew that it was going to make an appearance in my kitchen soon.

I decided to surprise Brad with a delicious brunch this morning...And we were both thrilled with how it turned out.  I served these hashed browns with fresh scrambled eggs, juicy peaches from Chilton county, and plump blueberries from the farmer's market.  It was the perfect blend of fresh fruitiness and hearty yumminess!  We didn't want the meal to end!

After a brunch like that, you know the day ahead will be fabulous!

Bon Appetit!***

Country Hashed Browns
Source:  Ina Garten, Barefoot Contessa

Ingredients:
5 tablespoons unsalted butter
1 1/2 pounds boiling potatoes, peeled and 1/2-inch diced
1 1/2 cups chopped yellow onions (2 onions)
2 teaspoons kosher salt
1 teaspoon freshly ground black pepper
2 tablespoons minced fresh flat-leaf parsley
2 tablespoons minced scallions, white and green parts
1/2 pound smoked ham slices, 1/2-inch diced


Directions:
Melt the butter in a large (10 to 12-inch) saute pan. Add the potatoes, onions, salt, and pepper and cook over medium-low heat for 15 to 20 minutes, turning occasionally with a flat spatula, until the potatoes are evenly browned and cooked through. (Allow the potatoes to cook for 5 minutes before turning.) Turn off the heat and add the parsley, scallions and ham. Reheat on top of the stove or over a hot charcoal grill.


Cook's Note: Use any leftover potatoes in Potato Basil Frittata (see recipe) for lunch.


You can peel and dice the potatoes early and keep them in the refrigerator in a bowl of cold water. Drain them and dry them well with paper towels before frying.

  • Digg
  • Del.icio.us
  • StumbleUpon
  • Reddit
  • RSS

Cheesy Squash & Tomato Casserole + Farmer's Market!


***Brad and I had such a great day today.  We started it off by visiting our local farmer's market - Pepper Place Saturday Market.  It was SUCH a fun experience...The produce popped with color and all looked absolutely delicious.  There were so many fantastic options...so much variety and so much to choose from!  Plus, I think it's extremely important to support our local farmers.  It's just impossible to beat produce that is THAT fresh and grown locally. 

Here are a few photos from the day...I had a blast taking pics!:


The very first thing that I bought were some gorgeous red Slocomb tomatoes.  For those of you not familiar with a little place called Slocomb, AL...Well, they grow the very finest tomatoes you'll ever put in your mouth.  There's even a Slocomb Tomato Festival to celebrate the harvest!

The second thing that I purchased was some yummy yellow squash...Brad's favorite!  This Cheesy Squash & Tomato Casserole was the first result of today's adventure (the second dish is baking in the oven right now...stay tuned for that recipe later!).  And I have to say...WOW!  The flavors of the fresh tomatoes and squash were simply fabulous.  The freshness of them, combined with the cheese was just perfection.  I made a few changes to Paula Deen's original recipe, which I've included below.

Bon Appetit...And please go support your local farmers!***


Cheesy Squash & Tomato Casserole
Source:  Adapted from Paula Deen's Cheesy Squash Casserole

Ingredients:

1 tablespoon vegetable oil
4 medium yellow summer squash, thinly sliced
2 large tomatoes, diced 
1 tablespoon butter
1 1/2 cups shredded mozzarella cheese
1/2 cup mayonnaise
Salt and freshly ground black pepper
1 cup fresh bread crumbs (Pulse 3 slices white bread in a food processor until you have small crumbs)


Directions:
Preheat the oven to 350 degrees F. Grease a 2-quart casserole dish.


Heat the oil in a large skillet over medium heat. Saute the squash and butter until soft. Transfer to a bowl and stir in the mozzarella and mayonnaise. Add the fresh tomatoes and stir until well combined.  Add salt and pepper, to taste.


Place in the prepared casserole dish and sprinkle the bread crumbs evenly over the top. Bake for 20 minutes or until the top is golden and bubbly.

  • Digg
  • Del.icio.us
  • StumbleUpon
  • Reddit
  • RSS

Foolproof Popovers


***Melissa d'Arabian's recipe for "Foolproof Popovers" is just that...foolproof!  These rolls are SO easy, that you won't believe it!  With the help of a blender, these come together in a flash.  On top of that, they puff up while baking and make a really cool presentation.  They puff up so tall, that you'll start to wonder if they're going to topple over.

One great trick that Melissa mentions during her TV show, Ten Dollar Dinners, is her "No Peek Rule."  Once the popovers go into the oven, DO NOT open the oven door until they are done.  That initial burst of steam from pre-heating the muffin tin helps them rise even taller.  You certainly don't want that steam and heat to escape from the oven too soon.

The inside of these popovers is creamy, just like Melissa describes.  They're light and airy, too....sort of hard to describe!  Strawberry jam made the perfect addition to ours.  After 35 minutes, my popovers were perfectly browned.  Try these today...You've probably already got all of the ingredients that you need on-hand!

Bon Appetit!***


Foolproof Popovers
Source:  Ten Dollar Dinners with Melissa d'Arabian


Ingredients:
3 tablespoons melted butter, divided
2 eggs
1 cup milk, warmed for 30 seconds in the microwave (should be lukewarm to warm)
1 cup all-purpose flour
1 teaspoon kosher salt


Directions:
Special equipment: muffin tin


Preheat the oven to 400 degrees F.


Using a pastry brush, coat 8 muffin cups with 1 tablespoon of the melted butter and put the tin in the oven for 5 minutes. Meanwhile, mix the eggs in a blender until light yellow. Add the warmed milk and blend. Add the flour, salt and remaining melted butter, and blend until smooth. Pour the batter into the warmed muffin tin and return it to the oven to bake until golden, about 35 minutes. Remove from the oven and serve warm.

  • Digg
  • Del.icio.us
  • StumbleUpon
  • Reddit
  • RSS

Grilled Asparagus with Prosciutto, Torn Croutons, Poached Egg, and Aged Balsamic Vinegar - Ad Hoc at Home


***Well, my obsession with the new Ad Hoc at Home cookbook continues with Thomas Keller's recipe for Grilled Asparagus. This dish is so delightfully fresh and just....different! The flavors of all the elements marry together so beautifully....fresh asparagus, poached eggs, croutons, and best of all...prosciutto...Yummy.

This was my first venture into poaching eggs. After watching Julie Powell's character struggle with poaching eggs in the movie Julie & Julia, I was a little nervous. Chef Keller includes thorough directions for this process, which helped tremendously. His trick of swirling the water in the pan twice worked really well. I will mention that I do not like eggs that are too runny, so I cooked mine for a bit longer than he suggests.

Brad especially liked this dish. I imagine it will taste even better in the spring, when asparagus is in season...and when we can actually grill the asparagus. I baked the asparagus in the oven, after drizzling with a little olive oil, salt, and pepper. It worked just fine!

I highly recommend this dish from Ad Hoc...It truly is delicious!

Bon Appetit!***

Grilled Asparagus with Prosciutto, Fried Bread, Poached Egg, and Aged Balsamic Vinegar
Source: Ad Hoc at Home by Thomas Keller; Page 156-157

Ingredients:
2 tbsp. white wine vinegar
6 large eggs
2 bunches pencil-thin asparagus
Canola Oil
Kosher salt and freshly ground black pepper
3 oz. thinly sliced prosciutto
2 cups Torn Croutons (recipe below)
Extra virgin olive oil
Aged Balsamic Vinegar
Fleur de sel

Directions:
To poach the eggs, bring 6 to 8 inches of water to a boil in a large deep saucepan. Prepare an ice bath. Add the vinegar to the boiling water and reduce the heat to a simmer. Crack 1 egg into a small cup or ramekin. Using a wooden spoon, stir the water at the edges of the pan twice in a circular motion to get the water moving, then add the egg to the center of the pan and simmer gently for 1-1/2 minutes, or until the white is set but the yolk is still runny (I cooked mine longer, because I'm not a fan of runny eggs). With a slotted spoon, carefully transfer the egg to the ice bath. Skim and discard any foam that has risen to the top of the water, and cook the remaining eggs one at a time. (The eggs can be poached several hours ahead and stored in ice water in the refrigerator.)

Prepare a charcoal or gas grill for cooking over medium heat, or heat a grill pan over medium high heat when you are ready to cook the asparagus. Line a baking sheet with parchment paper.
Hold an asparagus spear and bend it to break off the less tender bottom end. Trim all of the asparagus to the same length. If using medium or large asparagus, peel the stalks with a vegetable peeler. Spread the asparagus out on the parchment-lined pan, generously coat with canola oil, and season with salt and pepper.

Arrange the asparagus on the grill, or cook in batches in the grill pan. Cook for 1-1/2 to 2 minutes per side, flipping with a palette knife or narrow spatula, until tender. Arrange the asparagus on a platter.

Meanwhile, bring a large pot of water to a simmer. With a small pair of scissors, trim any uneven edges from the poached eggs. Lower the eggs into the simmering water for about 30 seconds, just to reheat. Remove the eggs with a skimmer or slotted spoon and blot the bottoms with paper towels. Season the eggs with salt and pepper and arrange around the asparagus.

Arrange the prosciutto and croutons on the platter. Drizzle the salad with olive oil and balsamic, and sprinkle with fleur de sel and pepper.

Torn Croutons
Source: Ad Hoc at Home by Thomas Keller; Page 274

Ingredients:
1 loaf country bread
Garlic Oil
2 tbsp. unsalted butter

Directions:
Cut the crusts off the loaf of bread. Tear the bread into irregular pieces no larger than 2 inches. You need about 3 cups of croutons; reserve any remaining bread for another use.

Pour 1/8 inch of the garlic oil into a large saute pan and heat over medium heat until hot. Spread the bread in a single layer in the pan (if your pan is not large enough, these can be cooked in two smaller pans). Add the butter. The oil and butter should be bubbling, but if you hear sizzling, the heat is too high. Adjust the heat as necessary, and stir the croutons often as they cook. Cook until the croutons are crisp and a beatuiful rich golden brown on all sides, 15 to 20 minutes. Move the croutons to one side of the pan and keep warm until ready to serve. (Do not drain on paper towels; you want the flavors of the oil intermingled with the other ingredients as you eat the croutons in a salad.) Torn croutons should be used the day they are made; you can reheat them in a low oven before serving if necessary.

NOTE: If you don't have any garlic oil on hand, pour 1/8 inch of canola oil into a saute pan, add 5 crushed, peeled garlic cloves, and heat over low heat until the garlic cloves are golden brown, flipping the cloves from time to time. Remove the garlic cloves and use the oil for the croutons.

  • Digg
  • Del.icio.us
  • StumbleUpon
  • Reddit
  • RSS

Pioneer Woman's Macaroni & Cheese

***I'm speechless...utterly speechless by the cheesy goodness that overwhelms you while indulging in this wonderfully scrumptious dish. I promise I'm not over-exagerating...LOL...This Mac & Cheese is sinfully yummy. I found it while perusing Pioneer Woman's new cookbook: The Pioneer Woman Cooks. By the way - You totally need this cookbook!!

Once you make this, you'll never, ever go back to the orange stuff in the box. There's just no comparison. I used a combination of Gruyere, Swiss, and Cheddar cheeses. That's just what I had on-hand, and the flavors worked great together....especially the Gruyere cheese, which has GOT to be one of my favorites! As you may have noticed, I also used shell shaped pasta...not the traditional elbow pasta. Again, it was just a matter of what I had in the pantry.

This recipe made a GIANT pot of mac & cheese....It was SO good, that Brad & I had it 3 nights in a row....Haha. Fortunately, it reheats wonderfully. I made the bechamel sauce in my Le Creuset dutch oven, added all the other ingredients, and then baked it all in the same pot...easy peasy! So, you don't necessarily have to end up with a sink full of dishes at the end of the night.

Make this tonight...You'll be in L.O.V.E.!!!

Bon Appetit!***


Macaroni & Cheese
Source: The Pioneer Woman Cooks; thepioneerwoman.com

Ingredients:
4 cups dried macaroni
1/4 cup (1/2 stick) butter
1/4 cup all-purpose flour
2-1/2 cups whole milk
2 teaspoons (heaping) dry mustard
1 whole egg, beaten
1 pound cheese, grated
1/2 teaspoon salt, more to taste
1/2 teaspoon seasoned salt, more to taste
1/2 teaspoon freshly ground black pepper
Optional Spices: Cayenne Pepper, Paprika, Thyme

Directions:
Preheat oven to 350 degrees F.

Cook macaroni until very firm. Macaroni should be too firm to eat right out of the pot. Drain.

In a small bowl, beat egg.

In a large pot, melt butter and sprinkle in flour. Whisk together over medium-low heat. Cook mixture for 5 minutes, whisking constantly. Don't let it burn.

Pour in milk, add mustard, and whisk until smooth. Cook for 5 minutes, until very thick. Reduce heat to low.

Take 1/4 cup of the sauce and slowly pour it into the beaten egg, whisking constantly to avoid cooking the egg. Whisk together until smooth.

Pour egg mixture into sauce, whisking constantly. Stir until smooth.

Add in cheese and stir to melt.

Add both salts and pepper. Taste sauce and add more salt as needed. DO NOT UNDERSALT!

Pour in drained, cooked macaroni and stir to combine.

Pour into a buttered baking dish, top with extra cheese, and bake for 20 to 25 minutes, or until bubbly and golden on top.

  • Digg
  • Del.icio.us
  • StumbleUpon
  • Reddit
  • RSS

Frank Stitt's Baked Feta with Focaccia

***It's hard to beat a super simple but delicious appetizer...Frank Stitt has created just that with his "Baked Feta with Focaccia."

Step One: Pour marinara sauce into a gratin dish.
Step Two: Sprinkle feta cheese over the sauce.
Step Three: Bake until bubbly!

Meanwhile, the focaccia is brushed with olive oil and toasted until golden brown. That's it!

Now, Chef Stitt does include his own recipes for both the marinara sauce and focaccia. However, it was one of those nights where I wanted to simplify! I used a good quality store-bought marinara sauce and substituted a fresh baguette for the focaccia.

This turned out marvelously and will definitely be a regular occurence in our household.

Bon Appetit!***

Baked Feta with Focaccia
Source: Frank Stitt's Bottega Favorita: A Southern Chef's Love Affair with Italian Food

Ingredients:
2 cups marinara sauce
1 cup crumbled feta
Four 4-by-2-inch rectangles focaccia
1 tbsp. olive oil
Pinch of cayenne (optional)
A few basil leaves

Directions:
Preheat the oven to 450 degrees F.

Spoon the marinara into a medium gratin dish (approximately 8 inches long) or divide it among four individual gratin dishes or ramekins. Scatter the cheese over the center.

Bake until the sauce is bubbling hot, 8 to 10 minutes.

Meanwhile, cut the focaccia into strips or triangles (large bite-sized pieces) and brush with the olive oil. Arrange on a baking sheet and toast in the oven until golden brown, 5 to 6 minutes.

Sprinkle the sauce with a little cayenne, if desired, and put the gratin dish on a large platter and surround with the focaccia, or put the individual dishes on serving plates and serve the focaccia on the side. Tear the basil leaves over the top. Dig in, or lose out.

  • Digg
  • Del.icio.us
  • StumbleUpon
  • Reddit
  • RSS

Tomato & Mozzarella Salad - Ad Hoc at Home


***So, if you haven't noticed lately, I am seriously in love with Thomas Keller's Ad Hoc at Home cookbook. I hope you're not getting tired of the Ad Hoc postings...there are certainly a few more recipes that I can't wait to share with you!

This Tomato & Mozzarella Salad caught my eye because it looked so fresh and delicious...Plus, I love, love, love caprese salad. We ate a caprese salad in Rome, Italy that was especially wonderful. The flavors were vibrant...the tomatoes were fresh...and the mozzarella was perfectly soft.

This particular recipe makes a gorgeous presentation, and it just gets better after the first day...once the flavors really have time to meld together. Mr. Keller recommends serving the mozzarella on the side of this salad, but I mixed mine right in. Thomas also includes instructions for making your own mozzarella. While this is something that I definitely plan to tackle one day, I did go ahead and use store-bought mozzarella this time around.

Shh...don't tell anyone...

Bon Appetit!***


Adapted from Thomas Keller's "Tomato and Handmade Mozzarella Salad"
Source: Ad Hoc at Hoc; Pages 148 - 149

Ingredients:
16 oz. fresh mozzarella, sliced
3-3/4 pounds assorted medium to large tomatoes
1/2 pound assorted cherry and/or grape tomatoes, such as Sweet 100s or Sun Gold
1/2 medium Armenian cucumber or 1/4 Engalish cucumber, peeled and thinly sliced
1/4 cup heavy cream (optional)
2 tablespoons Basil Oil (optional)
Extra Virgin Olive Oil
Kosher salt and freshly ground black pepper
1/4 cup thinly sliced red onion
12 to 15 small basil leaves, such as Italian, opal, and/or lemon lime
Fleur de sel
I made a dressing by mixing 1 part balsamic vinegar with 2 parts olive oil (or about 1/3 cup vinegar + 2/3 cup olive oil.) I drizzled this dressing over the entire salad before serving.

Directions:
Core the large tomatoes and cut into 1/2-inch slices. Halve or quarter the small tomatoes, depending on their size; leave some of the small stems attached. Peel the cucumber and cut into desired shapes.

To make the basil cream, if desired, whip the cream in a medium bowl until it just holds soft peaks. Fold in the basil oil. (The cream should not be refrigerated, or the texture will change.)

Spread the tomato slices on a baking sheet or work surface, with the wider side of the tomatoes facing up, and drizzle lightly with olive oil.

Turn the slices over, brush lightly with the basil cream, and season with salt and pepper. (The basil cream will add just a small amount of hidden flavor to the dish.) Drizzle olive oil over the small tomatoes and the cucumber.

Arrange the sliced tomatoes on a large platter, basil cream side down. Layer the cucumber slices and small tomatoes on top, and drizzle with olive oil. Scatter the onion and basil over the salad and sprinkle fleur de sel around the platter.

Serve with the mozzarella and remaining basil cream on the side.

  • Digg
  • Del.icio.us
  • StumbleUpon
  • Reddit
  • RSS

Olive Cheese Bread & ROLL TIDE!


***First of all, I just have to send a big "ROLL TIDE!!!" to all of my fellow University of Alabama Crimson Tide Fans! We won the National Championship last night, and it was awesome! I was so proud of our guys...they played hard in what turned out to be a fantastic game...they definitely deserved this historic win!! :-)

Now, back to your regularly scheduled programming:
I was so excited to receive Ree Drummond's new cookbook, The Pioneer Woman Cooks, on Christmas day. If you're looking for a hearty, delicious, mouth-watering dish, I'm sure that Ree has just the recipe for you.

After reading through the cookbook, this Olive Cheese Bread both sounded and looked divine. We love, love, love olives around this house, so I couldn't wait to give this a try. It tasted scrumptious...cheesy, olive-y, goodness!

I couldn't find straight monterey jack cheese at the store, so I had to use a cheddar/monterey jack mix. A great tip that Ree suggests in her cookbook is freezing part of the recipe, if you aren't going to eat it immediately. This worked perfectly for Brad and me. I baked up one half of the french bread, and froze the other half. I simply placed the Olive/Cheese mixture on the second half and froze it whole. Ree promises that it will bake up perfectly after thawing, and it will last several months in the freezer. So, next time I need a quick side dish or appetizer, all I have to do is pull this out of the freezer...Gotta love that!

Bon Appetit!***

Ingredients:
1 loaf French Bread
6 ounces, weight Pimiento-stuffed Green Olives
6 ounces, weight Black Olives
2 stalks Green Onions (scallions)
1 stick Butter, Room Temperature
½ cups Mayonnaise
¾ pounds Monterey Jack Cheese, Grated

Directions:
Roughly chop both black olives and pimiento-stuffed green olives. Slice green onions into thin pieces.

Combine butter, mayonnaise, cheese, olives and green onions in a mixing bowl. Stir together until thoroughly combined. Spread mixture onto French bread that has been sliced lengthwise. Bake at 325ºF for 25 to 30 minutes or until cheese is melted and browning.

Mixture can also be refrigerated (up to two days) and used as a dip. Great with crackers.

  • Digg
  • Del.icio.us
  • StumbleUpon
  • Reddit
  • RSS