


These cute tiger cupcakes, with hand-painted fondant toppers, are by PJ'S Baby Cakes in Lincoln, Nebraska, via Flickr. Visit pjsbabycakes.com for ordering information.
And unrelated but beautiful love cupcakes:
Showing posts with label fondant. Show all posts
Showing posts with label fondant. Show all posts
Smiling tiger cupcakes


Read User's Comments0

Rosebud bouquet chocolate cupcakes with fondant for Valentine's Day
Aren't these rosebud cupcakes perfect for Valentine's Day? You can find out how to make them from our friend and food blogger Diary of a Mad Hausfrau, who can also be found on Facebook. Via Flickr.

Garfield Cupcakes

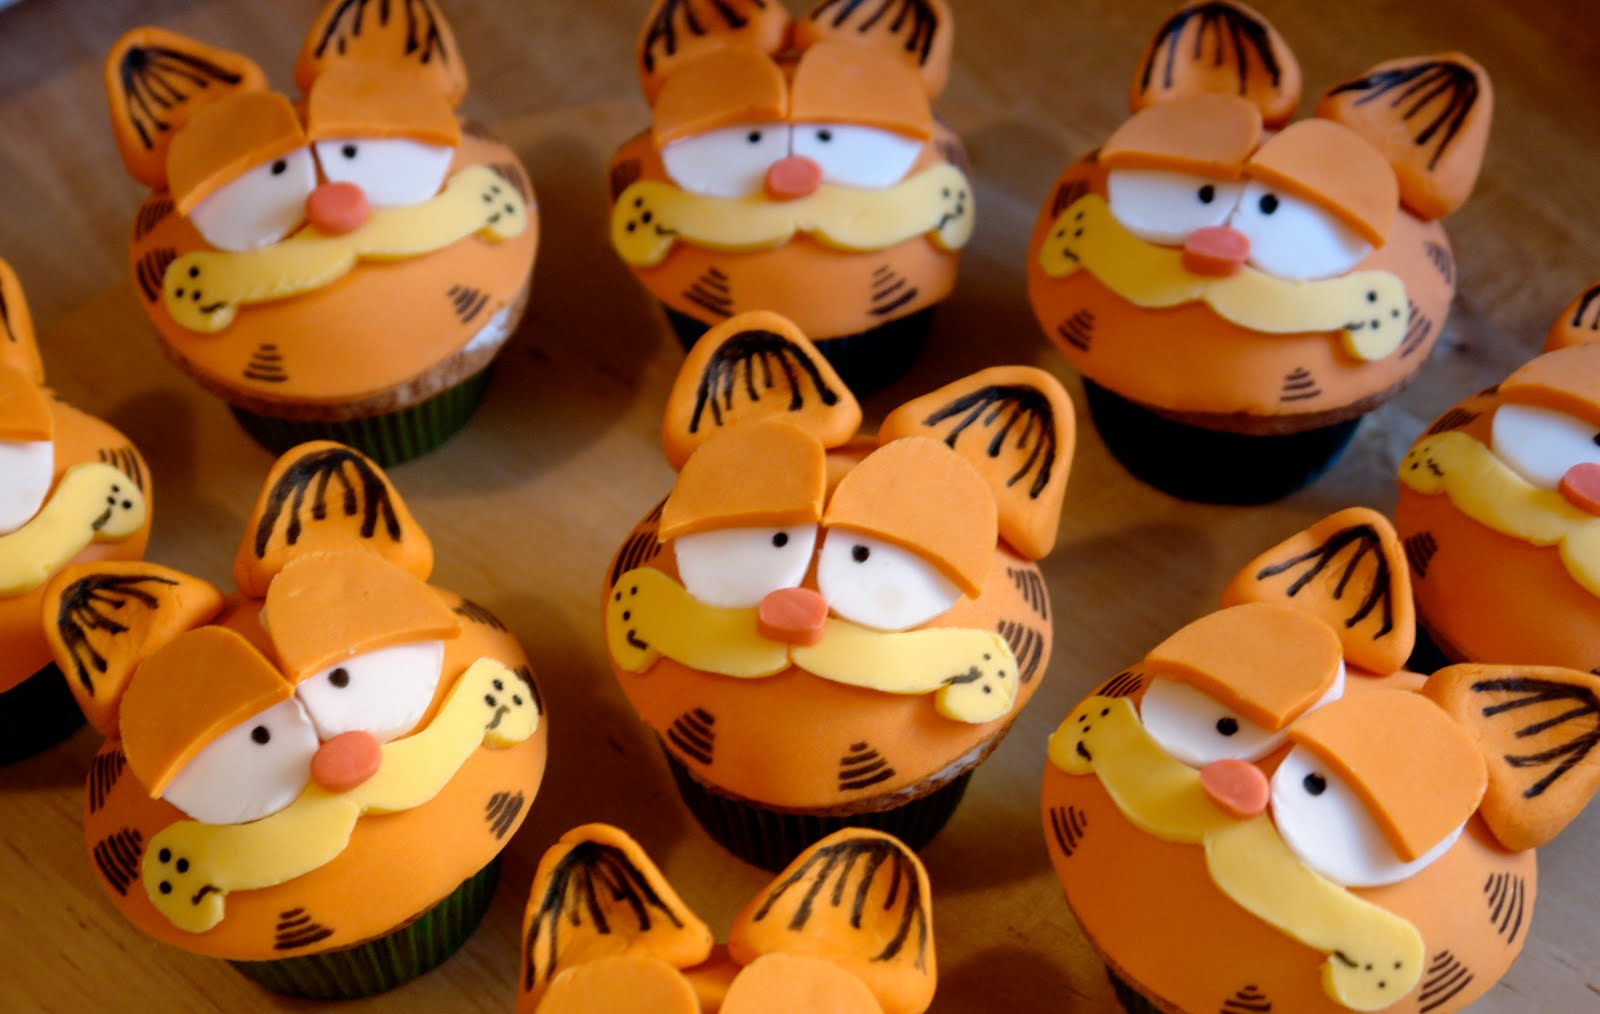

Looking good Garfield

All the eyes, ears, and mouths before they went on the cupcake tops

before the faces went on

I felt like they were watching me!
Do you think they knew they were going to be eaten?
Long time no blog! I know I have been terrible. I hope that you all can forgive me, I have been traveling once again for work and with that and the holidays things just got away from me. The good news is that I have been baking I just haven't been blogging so we have lots to catch up on.
Starting today with Garfield cupcakes! I was asked to make these for a little boys birthday this weekend which I thought was so fun. The mom sent me some pictures of other Garfield cupcakes and I gravitated toward the version that Bakerella had created. The only issue is that the adorable faces are all made out of fondant... uh oh. I have a pretty strict policy about not making things just to look good but they also have to taste good and fondant goes against that policy in a big way. However, after much back and forth I realized I couldn't get the level of detail I wanted to achieve with anything other than fondant so I decided to give it a go. I also figured that these were for kids and kids tend to not be bothered by the sugary taste of fondant since kids love anything sweet. So I decided to go with it, I promised myself that the cupcake itself and the buttercream under the fondant would be amazing to make up for the use of the fondant on top.
This was my first time ever using fondant so lets just say I was a little nervous but honestly once you get used to working with the texture it really can be pretty fun.You might be wondering how I pulled this off. My answer would be with a lot of planning.
First I created a template on the computer in Illustrator (if you don't have illustrator you can always draw it out by hand) I made the pieces of his face how I thought they should be, so two oval eyes, two eye lids, and a cute curled up mouth. The ears and nose I created just with my eye. I then printed the paper out - cut each shape, and traced those on to a thicker piece of card stock. I then cut out the pieces of card stock and used them as stencils when I was cutting out my fondant. I know this sounds like a lot to do but it only takes a few min and is worth the time. This way each cupcake looked the same and I could breeze right through all the fondant cuts.
For the fondant I used plain white fondant that you can find at any craft store in the baking section or at a baking supply store. To get the colors right to match the true Garfield I recommend using Wilton's gel coloring so that you don't water down the fondant. The colors are also much more vibrant - here is a link to Wiltons color chart, very helpful.
Once I had all my pieces cut out I dabbed a little water on each piece to get them to stick to the fondant rounds on each cupcake. One thing I did learn is that fondant dries quickly! So you kinda have to work fast. I used edible ink pens for the eyes and details on the edge.
Now I feel confident enough to try and take on any fun character only next time I think I will dry my fondant round out for a few hours and place them on top of the decorated cupcakes so that people can easily remove them if they prefer not to eat the fondant. I hope Jim Davis would be proud.
Sponge Bob Square Pants Cake
Cake ini pesanan Ayu untuk ulang tahun Anya, puterinya yang pertama hari Sabtu 22 Januari 2011 kemarin.
Ayu minta cake dengan thema Sponge Bob pakai icing (fondant).
Base cakenya aku pakai Double Chocolate Steamed Cake ukuran 26 cm. Carving dikit kanan kiri, bikin motif polkadot di atas badannya, lalu cover dengan fondant yang sudah aku warnai malam sebelumnya.
Niat awal nggak pakai kaki atau tangan. Waktu sudah jadi aku share di group BBM Bakul Rumahan, oleh teman teman disarankan pakai kaki dan tangan..hihih...ya wis, akhirnya jadi seperti ini. Kakinya agak ndlewer karena spacenya nggak cukup. Aku berhati hati sekali membuat matanya, karena expresi Sponge Bob tertumpu di mata, begitu mata kurang pas, pasti jadinya kurang lucu.
Makasih ordernya ya, Yu, semoga Anya suka... dan selamat ulang tahun buat Anya,semoga menjadi anak yang pintar, cantik dan lembut seperti Mamanya.. :)


It's My Apologies Cakes
Ini dia My Apologies Cakes yang aku maksud kemarin.
Cake ini khusus dibuat untuk mba Vika yang kemarin cupcakesnya ada masalah waktu delivery.
Seperti yg aku ceritakan sebelumnya bahwa mba Vika ini tidak minta ganti cupcakes yang figurinenya berubah jadi si kunti (hantu yg ada pakunya di kepala....hiiiii....), tapi karena aku merasa bersalah atas kelalaianku tidak double check lagi saat cupcakes di pick up sama kurir..... jadi aku kirimkan cake ini sebagai permintaan maaf.
Oleh sebab itu di atas cake tersebut tidak ada tulisan Happy Birthday tapi yang ada tulisan "SORRY"

Rasanya masih kebayang deh kejadian kemarin......, tapi masih semangat kok untuk baking lagi.
Pengalaman kemarin bagus juga untuk pembelajaran aku ke depan supaya lebih baik lagi.
Oh yah kurir yang kemarin juga sudah minta maaf kok, dan sebagai rasa tanggung jawab mereka kali ini ongkos kirim cakenya free loh !
Aku juga minta maaf yah mas-mas semuaaaa....., yah yang namanya manusia pasti ada human errornya, yang penting kita mau memperbaiki kesalahan tersebut, betul-betul-betuuuuuulllll.......... (upin-ipin donk!)


Sampai ketemu lagi yah di cerita selanjutnyaaaa......


glitter-graphics.com
Disaster!

I think the biggest disaster is that I always spell it "diaster."
Nah, not really. I think a volcano being attacked by a shark, giant octopus, wolf, The Cold, and an encroaching ocean is pretty disastrous. Oh! Don't forget the meteor and wrecked helicopter.

The cake turned out a little more cartoonish--maybe it was the fondant octopus or the light blue icy lava-- than I was originally picturing in my head, but it turned out really great. The "lava" and ocean are made out of royal icing, which made cutting into the cake a little more difficult than originally planned, and the meteor, octopus, and shark fin are all made of out Wilton fondant (why Wilton? Because it's cheap and no one was going to eat the pieces anyway). The volcano is chocolate buttercream, and the cake is coffee flavored.

Shout out to Sarah! For telling me how to make coffee cake, and to pass it on, I'll tell you now! (Because have you ever tried to google "coffee flavored cake recipe?" It doesn't work, I tell you!) OK, so you take your cake recipe (or box mix) and instead of putting water or whatever liquid, use double-brewed coffee instead. And my dad says there's some secret "thing" about double brewed coffee, like it will break the coffee maker or something...so I just asked him to brew the coffee for me.


Retro Circle Wedding Cake

This is a pretty simple cake, just a fondant covered cake with blue and green gumpaste circles.
This cake does have a funny story to go with it. Now I deliver cakes to the Tennessee Aquarium all the time, I even have a special little place to park around back on the loading dock. But when I go to deliver this cake, there's a huge Bluegrass Festival going on, and the way to my safe, secure little loading dock is completely blocked off by barricades and festival goers. So what's a girl to do??
I pulled into a little drive area that is in front of the aquarium, but still too far to carry a cake. I wasn't even supposed to be there - it's for the carriages only. After speaking with one of the staff, they decided that it would be best if I just popped up on the sidewalk and pull straight to the main entrance!
So I do, and as I'm riding on the sidewalk, I pass a policeman who is also on the sidewalk. He is giving me a wild look so I roll down the window and say "I'm here with the cake." Evidently, that was more than enough to satisfy him!! Being that close to the door I was in and out in a flash! I don't know if I can ever go back to the loading dock again!!
Trees and Leaves... Well it is that time!

It was one of those cakes that would have been pretty if I stopped at the first stage, which was the trees. It would have been prettier if I stopped at the next stage which was the curly vines. That was by far the most time consuming. Getting the little chocolate fondant snakes thin enough while staying even. I still don't know why I didn't get my clay gun out?! The one thing that made life easier was that after stacking I put the cake in the cooler for several hours while I worked on other projects. When I brought it out the condensation made it just the right amount of sticky! The trees and vines stuck on perfectly. It was a shame when it dried up and I had to go back to attaching with water or piping gel. I had it good for a while!
Back to the cake, I then added the leaves and it was prettier....and I could have stopped...but no! The "Save the date" cards had Autumn colored dots so I added a few. That is what made the cake for me! Pop pop pop...dot dot dot! I used the little circle cutter from Polymer Clay Express. These will be worth every cent! I love that site! The impression mats are good, not to mention the extruder guns. I liked everything about the cake except for the delivery which was 90 minutes one way and the last 2 1/2 miles was all on a gravel road that was not at all cake friendly! It was called Laurelwood and it was a beautiful location once we got there!
Cute Little Bows

It's a great way to add an extra splash of color while still maintaining a clean and simple look.
By the way, even though this cake looks small (and it was), it was red velvet cake with cream cheese icing. Add a layer of fondant to the whole thing and this was one heavy cake!! It took both of us to carry it!!!
Also, a funny little story while we were setting up this cake: Chad was finishing the placement on this cake, putting on the topper, and taking photos when another couple approached the cake. The man commented "Hey, I know what that is! That's fondue icing!! I saw it on Cake Boss!" The woman immediately piped in with "No! It's cream cheese icing! The lady already said what kind of icing it was!" A few moments of silence later and they both looked at Chad and said, "Well, who's right?" Chad came back with, "Well, you are both correct. There is cream cheese icing, but there's also another icing layer on top of that - and it's actually called fondant icing." The man replies back with "See, I told you it had FONDUE icing on it - I watch Cake Boss, I know all about FONDUE icing!"
OK, so maybe it wasn't the funniest story you've ever heard, but it was the highlight of our delivery day!
Masuk kelas lagi dan lagi...


Ahad lepas, aku masuk kelas lagi, kali nie kelas fondant pulak,sifunyer Chef Eugene Wong, memang berbaloi-baloi la masuk kelas nie...banyak tips dan teknik yg di beri...
Rasa lagi confident nak buat kek fondant lepas nie...
so, pada sape yang berminat nak tempah kek fondant di persila kan....
Peanut Butter Paradise

Nothing terribly fancy going on here - the sides of the package were made from rice crispy treats and the whole thing was covered in fondant. The one cool thing we did on this cake was to use our Cricut Cake to cut out the logo. Chad took the logo and somehow got into this new software we bought (called Sure Cuts a Lot) and used it to cut the logo out of modeling chocolate. It was very cool, and if we ever do another one, we can use the same file to make it as large or small as we need!
Once it was finished I had some extra space left on my cake board so I covered most of the exposed areas of the board with ganache and then topped it with quartered peanut butter cups and Reese's Pieces! Peanut Butter Paradise!!!
For the Little Dudes . . .

Desserts for Dudes month continues with Cute as a Button cookies
...because dudes have to start somewhere!
When our little dude was born, he decided to make an entrance. An unexpected entrance via emergency c-section, 10 weeks early. He weighed 2 pounds, 13 ounces.
{Kiddo is now 11 years old and 5 feet tall....wearing the same size shoe as his mother...}


Supplies for the buttons:

- fondant
- AmeriColor Sky Blue Soft Gel Paste Food Color
- bench scraper

- tips: Wilton 4B, and #1 or #2 plain tips
- cornstarch
- rolling pin
- toothpicks
- chopstick
Dust the surface and rolling pin with cornstarch to prevent sticking, a tip Buddy gave us, and roll the fondant thin, maybe 1/8 to 1/4 of an inch. Use a bench scraper to lift the fondant off the counter if necessary.


{PS...I'm not going to quit blogging to be a hand model anytime soon.}


{Seriously, what are those holes called? A button hole is something you push your button through. There must be a name of the holes in the middle of a button. Anyone? Anyone?}

{Again...no hand modeling.}


For the cookies:
- Outline & flood the cookies with royal icing and let dry overnight.
- Pipe the dots around the border.
- With an AmeriColor Gourmet Writer Food Decorator Pen , add the wording. (AmeriColor pens are much better than the ones as the grocery store!)
- Attach the buttons with a bit of royal icing.
- Let dry several hours.


Subscribe to:
Posts (Atom)